How to Create a New Customer / Account
The following article describes how to Create a New Customer / Account in IDS 2 Dispatch.
Creating a New Customer / Account
Step-by-step guide
- Click on the "Accounts" tab
- You will be working in the "Create/Edit Accounts" Section.
- The first step is to decide on the Account Code for this customer. Account codes:
Cant contain spaces
- Cant contain special characters such as "!@#$%^&*()_+-={}[]|\:;"'<,>.?/"
Can only be numbers and/or letter
Account Codes will be locked after you first save the customer. You will NOT be allowed to change the account code field once you have saved the customer's account in IDS 2 Dispatch
- Enter in your unique account code here:
- You will notice, IDS changes the Account Code by prefixing it with your company's account name. This ensures that all accounts are unique.
- For example if 2 IDS clients have an account of: 12345 or ABCDE
- By adding your Company's name in front of the Account, it ensures that Account Code is unique.
- This is to protect your company and your customers.
- Enter in the Company Name.
- Unlike the Account Codes, Company Names have no restrictions and can be changed in the future.
- Company Names will be visible to your clients.
- Enter in the Account's Admin Name.
- The first part of this name will make up part of the login your customers will use to login to their Online Shipping Portal (which allows them to enter in new Shipments, Track and Trace Shipments).
- The first part of this name will make up part of the login your customers will use to login to their Online Shipping Portal (which allows them to enter in new Shipments, Track and Trace Shipments).
- Then enter in the Account's Admin's main phone number.
- Then enter in the Account's Admin's email address.
- When you save this account for the first time, this email address will be used to send this person a "Welcome Email" with their login credentials for the Online Shipping Portal (which allows them to enter in new Shipments, Track and Trace Shipments).
- Will be used when you click the button labelled "Send Welcome Email" located on the bottom of this screen.
- Now enter in their password
- This will be used by your client to login to the Online Shipping Portal (which allows them to enter in new Shipments, Track and Trace Shipments).
- You will have to enter the password twice.
- Once in the field labelled "Admin Password (Required)"
- The second time in the field labelled "Password Confirmation (Required)"
- If you need to see what you typed into these 2 fields ( "Admin Password (Required)" and "Password Confirmation (Required)"). Click the eye icon.
- If there is any Account Notes you would like to attach to this Customer, type those notes into the "Account Notes" field.
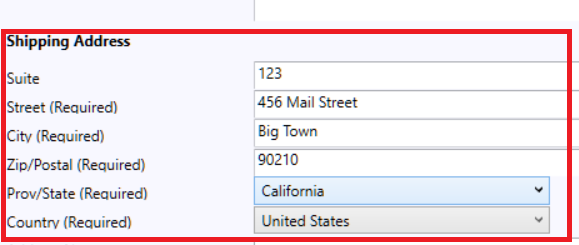
- In the "Shipping Address" section, type in this Account's main Shipping Address.
- If there is a note that you wish to appear in the "Enter New Trip" tab anytime this address is used, type that note into the "Address Notes" field.
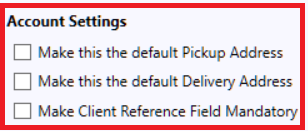
- The "Account Settings" section has a few options. They are:
- "Make this the default Pickup Address", will make the "Shipping Address" the default Pick Up address in the "Enter New Trip" tab when you create a new trip for this account.
- "Make this the default Delivery Address", will make the "Shipping Address" the default Delivery address in the "Enter New Trip" tab when you create a new trip for this account.
- "Make Client Reference Field Mandatory", will make the "Client Reference" field in the "Enter New Trip" tab mandatory for any new shipment created for this account.
- Then tick the box beside "Enabled"
- Then click the "Add/Update" button.
- You dont have to click the "Send Welcome Email" button as a Welcome Email will be sent to the "Admin Email" when you click the "Add/Update" button.
, multiple selections available, Use left or right arrow keys to navigate selected items


