Shipment Details Screen
- Gord More (Unlicensed)
- Devyn Caterer (Unlicensed)
You can navigate to this screen by tapping a shipment in the Pick Up / Deliveries Screen, the DSD Deliveries Screen and other screens.
The following screen shots will show different service levels and packages types than when you login because of your company's unique set up. The following screen shots are only to provide an example.
The Trip Details Screen looks like this:
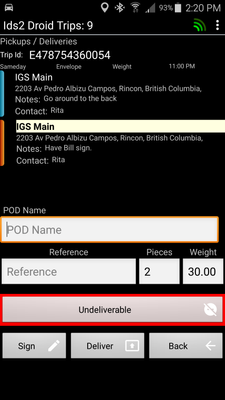
Across the top of the screen, you will see this:

This is the unique Trip ID for this shipment.
Then you will see this:

This is broken down:
- The first label is the Service Level of the shipment.
- The second label is the Package Type of the shipment.
- The third label is the weight of the shipment.
- The fourth is Time. If the shipment is for Pick Up, then this will be the Ready Time. If the shipment is for Delivery, then this will be the Due By time.
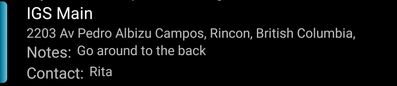
The first address you see is the Pick Up Address with Pick Up Notes. For more functionality with addresses, please see the bottom section of this article.
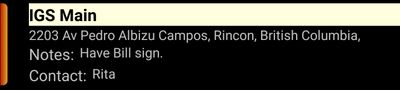
The second address you see is the Delivery Address with Delivery Notes. For more functionality with addresses, please see the bottom section of this article.
The next part is where you can enter in a Proof of Delivery Name (POD). If this shipment is for Pick Up, for chain of custody requirements, you can also enter in a Proof of Pick Up (POP) into this field.

Before marking the shipment as Delivered or Picked Up, enter in the name of the Shipper (POP) or Receiver (POD). Depending on your company's settings, this maybe set so that a POD must be captured to deliver a shipment.
The next section shows the shipment's reference codes, the number of pieces and the weight.

If activated for your company, these fields can be edited at the point of Pick Up or Delivery.
The next button allows you to mark the shipment as Undeliverable, this will notify the dispatcher that the shipment cant be delivered. This maybe turned off for your company.

"Undeliverable" can be customized to automatically email your company's customer services department that the shipment cant be delivered.
The bottom row shows 3 buttons, they are:
 When you click this button the following screen appears.
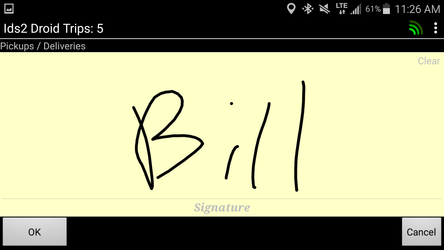
- Can be used at the point of Pick Up (for Chain of Custody) and at the point of Delivery.
- To capture a Signature, simply have the shipper or the receiver sign the screen with their finger or a stylus.
- Depending on your company's setting, this maybe set so that a signature must be captured to deliver a shipment.
- If you need to recapture a signature, touch "clear" on the top right hand side of the screen.

- When you are done, click "OK" to return back to the Trip Details Screen.

- The next button will show as either:
 If the shipment is for Pick Up. Simply click to update the shipment's status to Picked Up.
 If the shipment is for Delivery. Simply click to update the shipment's status to Verified.
 clicking this button will return you back to the previous screen.
If you press and hold on the Pick Up or the Delivery Address sections the following pop up will appear:
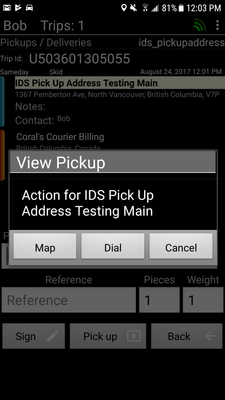
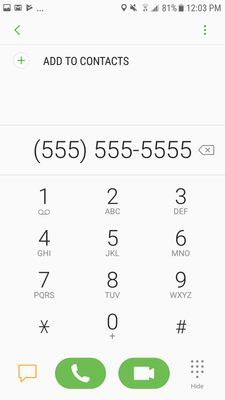
If there is a phone number for this address, to phone that address contact directly, click on "Dial":
If you click on "Map", the IDS 2 App will open up your phone's default mapping app (most likely Google Maps) and map the address you selected:
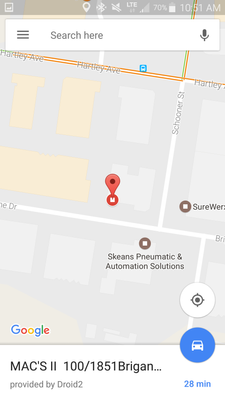
If you are using Google Maps, you can then turn on GPS Turn by Turn Navigation to navigate you to the address.
For more details on:
- How to set your Default Map App: http://www.androidauthority.com/change-default-apps-android-2-633572/
- How to use Google Maps App: https://support.google.com/maps/answer/6139433?hl=en